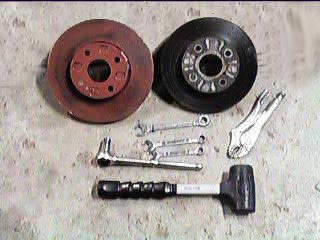
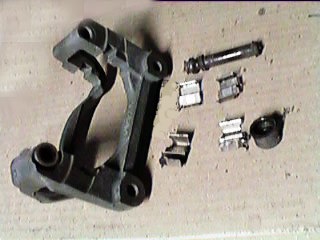
On the left is the new larger rotor. It has been painted red for clarity in this installation.
Below are the hand tools needed for the conversion.
Tools
12mm, 14mm combination wrenchs
14mm socket
Vise grips or other large pliers
Dead-blow hammer (you can use a soft faced mallet instead)
Floor Jack, jack stands, Lug nut wrench
Brake cleaning spray, yellow high temperature grease
Mazda part numbers for the brackets:
NA75-33-291 |
Front Left |
NA75-33-281 |
Front Right |
NA75-26-29X |
Rear Left |
NA75-26-28X |
Rear Right |
These brackets ran about $200 for all four from Roebuck Mazda.
You will also need to order new brake pads from your favorite supplier. I like the Hawk Pads in Blue for the front and Black for the rear. Make sure when you order them, you specify that it is for a 1994+ Miata.
| Side
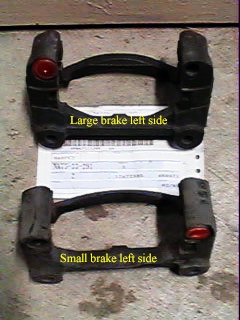
by side comparison of old vs new An interesting aspect of the brackets, as shown in this side by side comparison, the pivot socket for the calipers (highlighted in red in the image) is on opposite ends of the bracket. Thus the need for swapping sides when the brackets are installed--yes, you understand correct, the part number listed for the left side is used on the right and vice versa. In the image are the front left brackets; original on the bottom, new, larger on the top.
|
 |
 |
The First
Step: Jack the front of the car up using the standard methods you typically do. I use a floor jack and a 2x6 24" long with a 5/8" deep and wide groove running down the middle of the length. The seam under the doors that is normally used by the stock jack fits in the groove in the wood. I can lift the entire side of the miata this way. Once the front is up and on jack stands, remove the wheels and set them out of the way. Turn the steering wheel to full lock in one direction (let's start with right) and then go to the left side--the rear edge of the rotor will be further out this way. |
| Caliper
Removal The bolts you want to access are all on the inside surface. The first bolt is 12mm on the bottom outside edge of the caliper itself. This bolt is only threaded for about 15mm from the head; the rest is smooth so that the calipers can move in and out. Pull this bolt out and the caliper will be able to flip up on its pivot. As it does, the springs that are attached to the brake pads may cause the pads to pop off. Watch for this to keep track of which side and placement everything has. It's ok if they come off, as you will be removing everything anyway. |
 |
Now is a good time to turn the wheel and do the other side. Follow the same procedure and make sure that you keep track of which bracket goes to which side. If you get confused, don't worry, the curved portion faces the hub and the straight part goes on the back, with the pivot hole on the top.
 |
Old
into New Match up the brackets you just removed with their new counterparts. Make sure that the pivot point and bolt are oriented in the same direction. Left is right, and vice versa. You might want to use a little Berryman's Brakekleen spray to clean off the cruft since you have to tranfer the clips and rubber grommets over (for some strange reason, these bits are only available if you buy a new set of calipers for mucho dinero) The image to the left has the four clips and two rubber grommets oriented to be installed on a new bracket. The little clips should stick out rather than in. |
After the rubber and spring steel bits are are replaced, fill the grommets with high temp yellow grease. Now is a good time to pop the old rotors off. A small whack with a deadblow hammer might be needed to break the seal if rust has gotten in there. But a Miata in good condition should have loose rotors when the calipers are off.
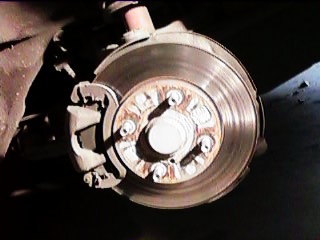
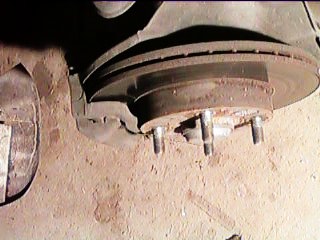
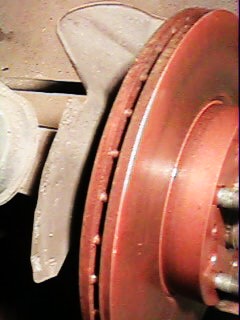
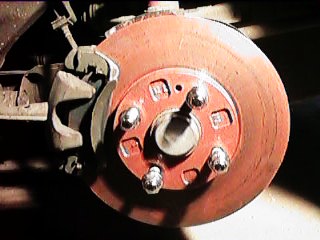
| Rotor meets
backing plate - Not! As can be seen in the two images, the backing plate will require a bit of judicious vice-grip application. The new rotors are too big to fit clear of the bent lip, so it has to be straightened out. You don't want to remove the plate entirely because it also acts as a duct for air to help cool the brakes and keep them dry. Spin the rotor to make sure that it doesn't bind up any place before installeding the brackets. |
 |
 |
 |
Putting
it all together The only trick to installation is getting the caliper to flip down over the new pads with the little V springs helping to push them out. The clearance is really tight with new pads but rest assured that the calipers will fit, the part numbers are the same for all years of Miata Bolt the brackets to the spindles with the 14mm bolts. Standard torque for these bolts is 58 ft/lbs. The 12mm bolt that holds the caliper in the lower pivot should just be hand tight, about 35 to 45 ft/lbs. |